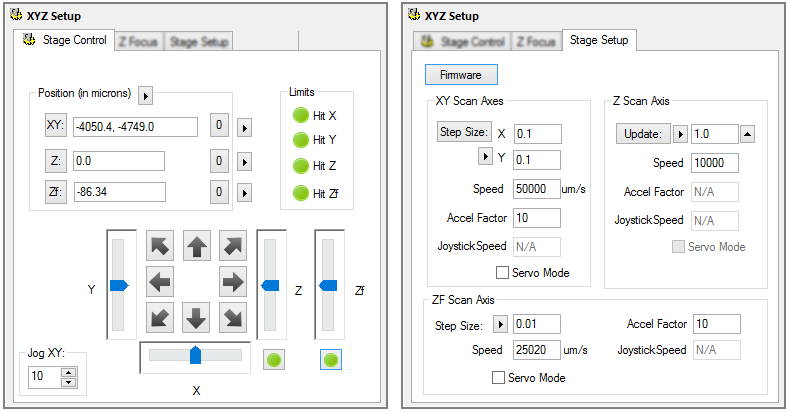
The XYZ Stage Setup panel in located in the Device pane. The setup tabs will differ for each of the manufacturers as well as the enabled scan axes. The Step Size, and other parameters must be correctly set to achieve proper control. Refer to the manufacturer’s documentation and specifications first. The default values are likely to be correct, but may not be in all cases.
HCImage can support two Z motors, one for coarse (Z) focus and one for fine (Zf) focus. The fine focus Z is typically used for piezo stages and focus control devices.

Note: For a detailed description of the Z Focus Controls, including Auto Focus see "Z Focus Controls."
Stage Control is available using software or by using the joystick, to allow positioning of the X, Y and Z axes. Stage devices are installed in the Device Setup Menu of the Current Profile.
The units for stage position are set to microns by default but may be set to nanometers or millimeters as well.
The Current Position is constantly read from the controller and displays the current location of the XY and Z-Axes. This number can also be input numerically to instruct the controller to drive to a specific position.
Click the XY or Z button and enter the new coordinates for the stage. Stage coordinates may also be entered directly in the Current Position.
The Zero Position button provides a choice of three functions:
The Position sub menu button, to the right of the Zero Position button, includes:
Position limit lights are displayed for each position and indicate:
This is the distance in microns that the stage will move when the arrow keys are pressed. The increment may be entered directly or using the buttons.
The Position Sliders allow each position to be changed by clicking and dragging the slider handle. The movement of the slider is relative, not absolute, so dragging the slider further up or down (left or right) the scale will produce a faster movement in that direction.
These buttons will move the stage by the current increment amount specified in Jog XY.
Apply Z Auto Focus
Click the Auto Focus button, located below the Z position slider, to perform an auto focus.
For Stage devices with X and Y scan axes the configurable properties include:
For Stage devices with a Z-scan axis, the Z-axis properties can be configured separately.
Note: In the Stage Setup tab, the top-right most button retrieves the hardware firmware version.
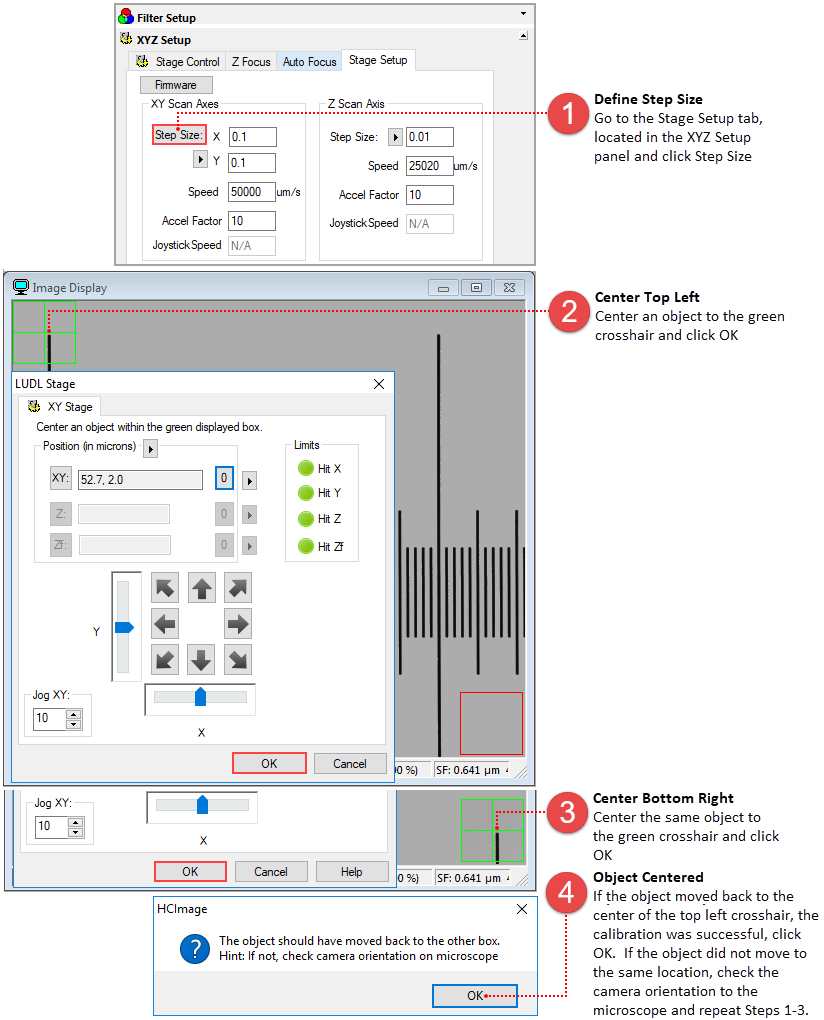
It is highly recommended to Calibrate the XY stage to precisely define the step size of the device in the target environment. The manufacturer’s calibration may be a nominal estimate. Before calibrating the stage, make sure to load the correct scale factor for the selected objective and then follow the instructions below.

The step size created should approximate the manufacturer’s specifications. If the numbers are negative, this simply means that the capture device is rotated compared to the XY stage motor directions. If positive numbers are required, either change the controller hardware settings, or rotate the capture device to correct it. Subsequent scan patterns will be positioned below and to the right of the current image.
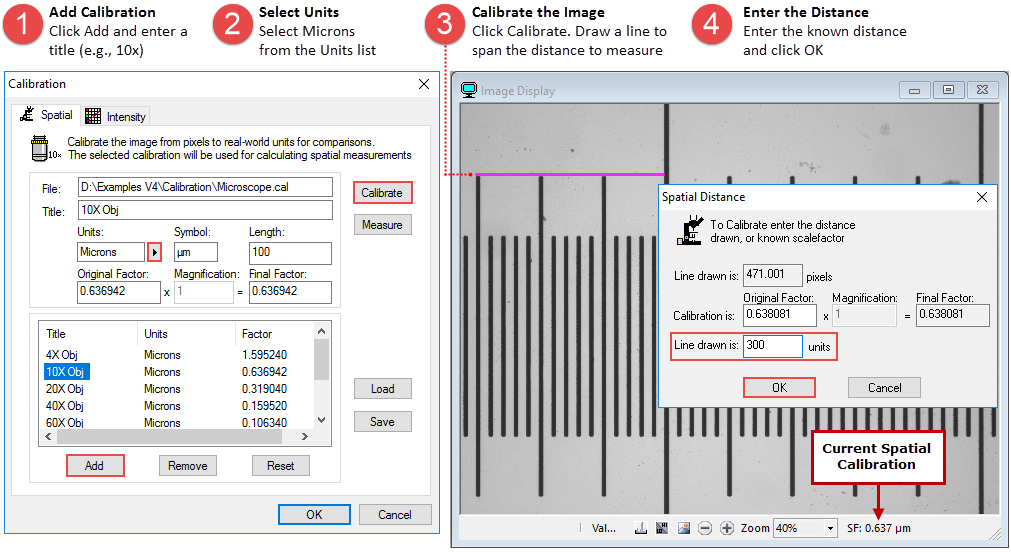
Open or capture an image with some known distance, for example a micrometer. Click on the Calibration Properties icon (![]() ) on the Analysis toolbar and follow the instructions below.
) on the Analysis toolbar and follow the instructions below.

To link the calibration to an objective, go to the Microscope Setup panel in the Devices pane and follow the steps below.
